What makes a jigsaw linocut work
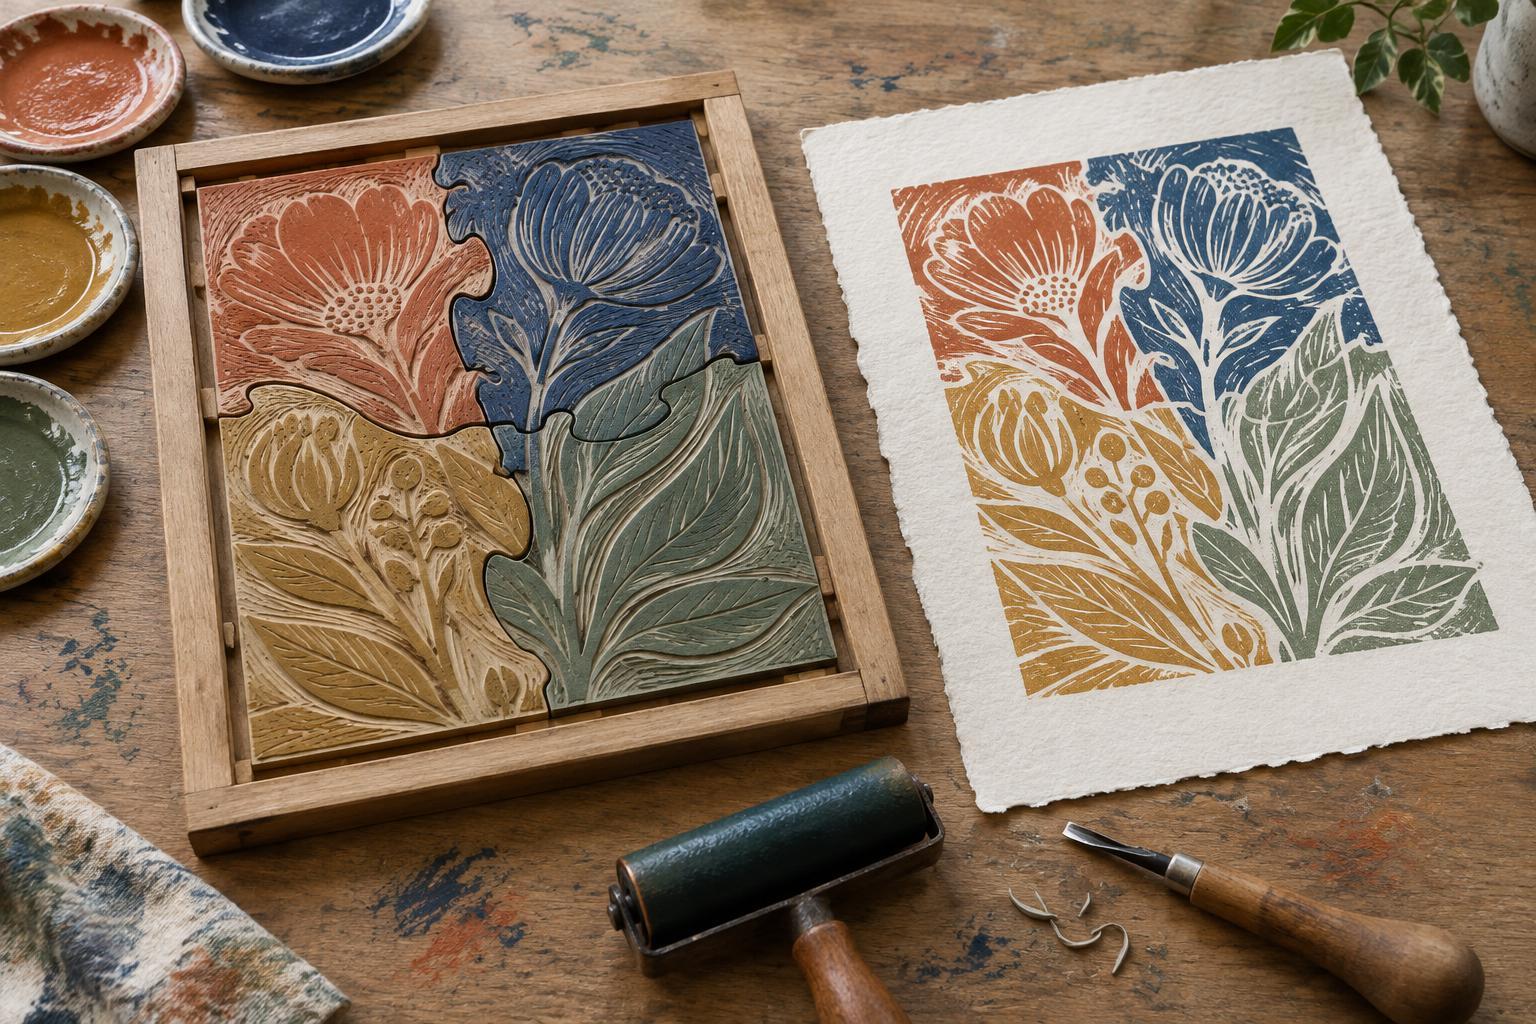
A jigsaw linocut starts as one relief block that is divided into separate pieces. Each piece receives a different ink color, and the pieces are fitted together before printing. Because the colors transfer in a single impression, you do not need to pass the paper through a press several times to align separate color blocks. It is a useful approach for an image with broad, clearly defined areas of color.
Think of the seams as part of the design. A cut that follows the edge of a leaf, a roofline or a silhouette is easier to conceal than one crossing a quiet area of sky. The method is less convenient for tiny isolated patches: small pieces can be difficult to hold, ink and return to exactly the right place. For a first attempt, try a postcard-sized image with two or three large color regions.
Plan the image and divide the block
Draw the image on a single piece of lino or another relief material suitable for carving. Mark the intended color boundaries in one distinct pencil line, then mark the areas you will carve away. Remember that any letters or directional features must be reversed on the block to read correctly in the print. Before cutting, check that every proposed piece is large enough to handle and that the remaining shapes can fit together without confusion.
Carve the image while the block is still whole if that gives you a steadier surface. Then separate the color regions along your marked boundaries, using a sharp knife on a cutting mat and keeping your other hand clear of the blade. Make controlled passes rather than forcing a deep cut at once. Label the backs of the pieces and photograph or sketch their arrangement for reference. Keep all pieces from the same block together; substituting a piece of different thickness can make even printing harder.
Build a simple setup for reassembly
Place the pieces together on a flat surface and check the fit before opening any ink. Small gaps may print as pale lines, while overlapping edges can prevent the block from sitting level. A shallow registration frame made from scrap board or strips of sturdy card can help you return the assembled block to the same position. Leave enough room to lift each piece out without bending it.
Decide where the paper will sit in relation to the block. Two pencil marks on a backing sheet can establish a consistent corner; a hinged guide can help if you are placing the paper by hand. Make a dry run with clean pieces and scrap paper. Practice lifting, replacing and covering the assembled block without shifting it. This rehearsal is especially helpful when the design includes a narrow piece that might move during printing.
Ink and print one impression
Roll out each color in a thin, even layer and use a separate brayer for each ink. Ink one piece at a time on scrap paper, paying attention to its outer edges, then return it to the frame. Avoid loading so much ink that it collects along a cut seam. If a piece picks up stray ink on its underside, clean it before reassembly so it can lie flat. Work steadily rather than rushing: the aim is a level, stable block.
Lower the paper onto the assembled pieces using your chosen guides. Print with a press set appropriately for the block and paper, or burnish the back by hand with even pressure while holding the paper still. Lift a corner carefully to check the transfer before removing the sheet completely. If one region is faint, first inspect its ink coverage, height and position. Changing several things at once makes it difficult to learn what caused the problem.
Refine the proof and plan a small edition
Let the first impression serve as a proof, not a verdict. A narrow unprinted seam might add a crisp boundary, or it might interrupt a shape you wanted to read as continuous. You can adjust the cut, revise the carved marks or change the order in which you ink the pieces. Test one adjustment at a time and keep the proofs so you can compare them. Bear in mind that trimming a piece cannot be undone.
For a small edition, prepare and mark all sheets before printing. Keep the same paper orientation, block position, ink colors and approximate ink layer throughout the run. Set each finished print aside where it can dry without touching the next. When the run is complete, compare the impressions and separate clear, consistent prints from working proofs. The slight variation between sheets is part of hand printing; planning and a repeatable setup help keep that variation intentional.