Plan a plate around texture
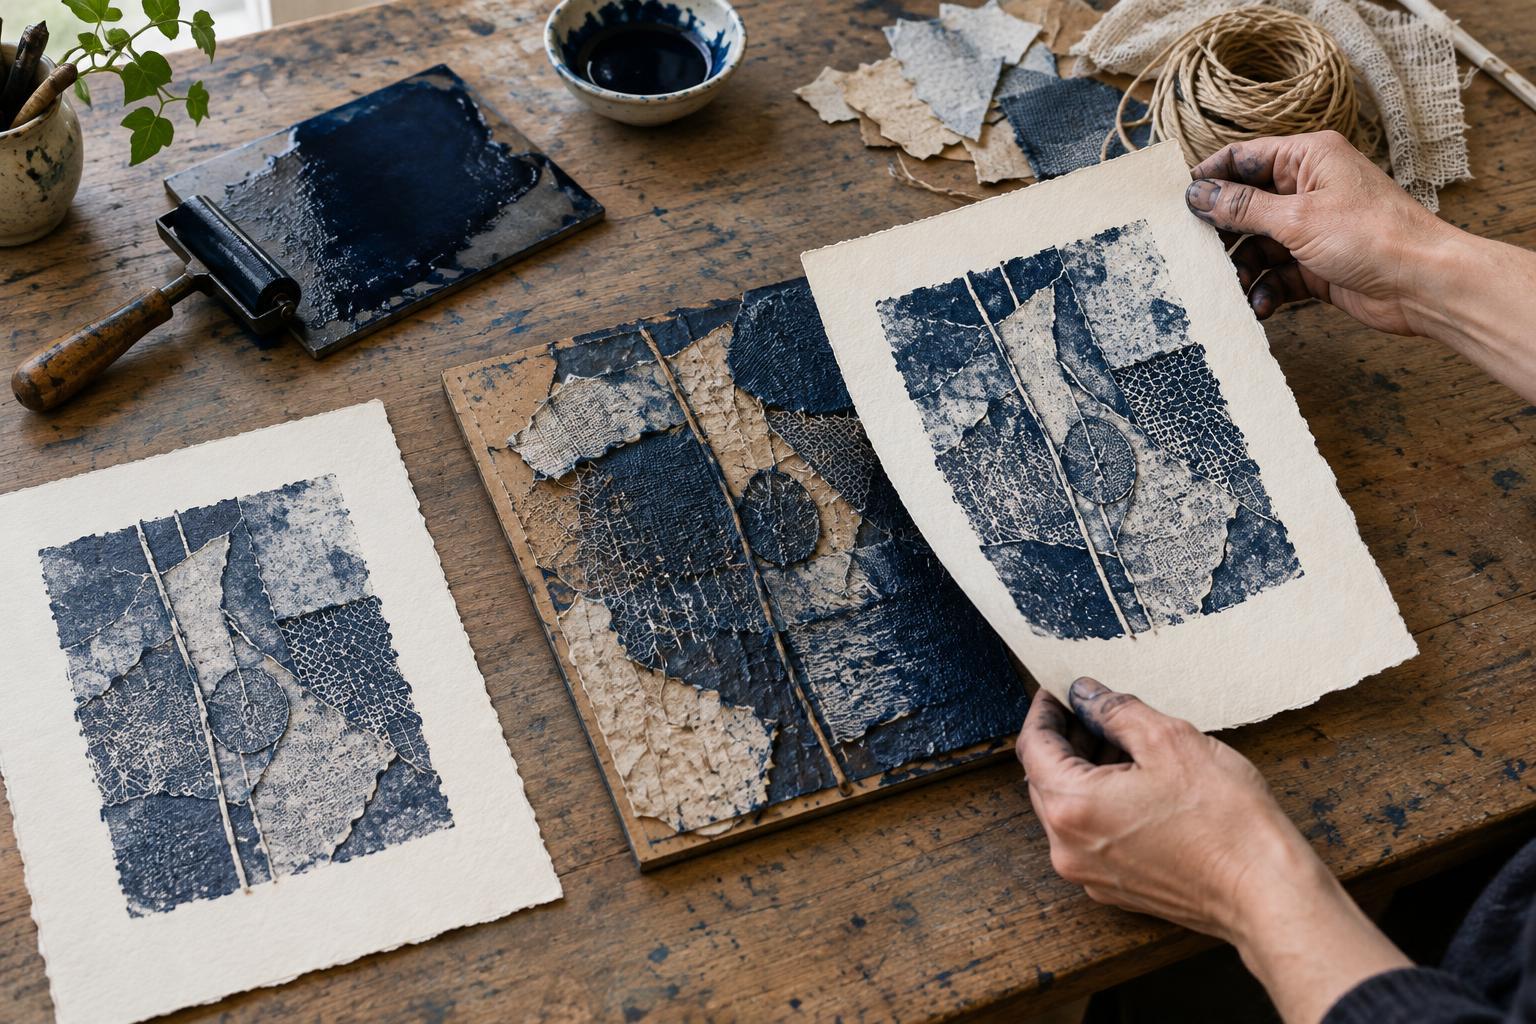
A collagraph is a print made from a plate built up with attached materials. Unlike a carved block, its marks come from both raised surfaces and shallow recesses. The same plate can give very different results depending on how it is inked and printed, so begin with a simple composition and leave room to experiment.
Choose a rigid base such as sturdy mount board or thin, smooth cardboard. Cut it to a manageable size, then arrange a few materials without glue: torn paper, thin card, string, lace, textured packaging, or a small piece of fabric. Varying just two or three textures makes it easier to see what each one contributes. Keep raised elements fairly low and avoid sharp or loose pieces that could tear paper or catch on a roller.
Think in broad shapes before adding fine detail. A strip of card might form a horizon, while torn paper creates a softer edge and string provides a line. Remember that the image will print in reverse. If direction matters, sketch the design on the plate with that reversal in mind; save readable text for another project unless you have planned its mirror image.
Assemble and seal the surface
Glue each material securely, paying particular attention to edges. A thin, even layer of suitable craft glue is usually easier to control than a thick bead, which may create unintended ridges. Press down attached pieces gently and allow the plate to dry flat. If you want recessed marks, cut or score shallow lines into the base before sealing it, taking care not to weaken the board.
A sealed plate is easier to ink and wipe consistently than absorbent, unfinished cardboard. Once the glued materials are dry, coat the entire printing surface and its edges with a thin layer of acrylic medium or another plate sealant suitable for your chosen ink. Let it dry thoroughly, then add another thin coat if any areas still seem porous. Work in a ventilated space and follow the product label. Thick coatings can fill the very textures you want to print, so build protection gradually rather than flooding the surface.
Before making a finished print, run a fingertip lightly across the dry plate. Reattach any lifting corners and check that no dried glue protrudes unexpectedly. The plate need not feel smooth, but its materials should stay in place through repeated inking and cleaning.
Try relief and recessed inking
For a first proof, try relief inking: roll a thin, even film of printmaking ink onto a brayer and pass it lightly over the plate. The roller will tend to touch the highest areas, leaving some lower spaces uninked. Make several passes in different directions if needed, but avoid pressing so hard that the roller pushes ink into every recess. A water-based printmaking ink can make cleanup straightforward; check that it is appropriate for the plate and paper you are using.
To explore recessed printing, work ink into the textures with a piece of card or a soft applicator, then wipe the surface gently so ink remains in lower areas. This approach may need more pressure than relief printing to transfer fine marks, and results vary with plate height and paper. Start with a small plate so you can learn how much wiping and pressure it needs without using a large sheet each time.
You can also combine the methods: wipe ink into recesses, then roll a second color across the raised surfaces. Use a light touch and proof the plate before committing to a series. If colors mix more than you intended, clean the plate and try a thinner layer of ink or a gentler pass with the roller.
Print by hand and read the proof
Place clean paper over the inked plate and protect the back with a spare sheet. For relief printing, rub across the back with a baren or the smooth back of a spoon, keeping the paper from shifting. Lift one corner carefully to check the transfer before removing the sheet. A printing press, if available, can help bring paper into lower textures; use appropriate packing and avoid forcing a thick plate through equipment not suited to it.
Paper choice changes the result. A smooth sheet may show crisp raised edges, while a softer paper may pick up more of the plate’s texture. For recessed marks, some printmakers use paper that has been lightly dampened and then blotted, but too much moisture can weaken it or blur an impression. Test with small sheets first, particularly when using water-based ink.
Treat the first impression as a proof, not a verdict. Pale areas may indicate too little ink or uneven pressure; filled-in details may mean too much ink, heavy rolling, or a textured material with insufficient space around it. Note what you changed between pulls. Adjusting one thing at a time makes the plate easier to understand.
Make a small, consistent series
Once you like a proof, decide which qualities you want to repeat and which variations you welcome. Mark the plate position on a clean work surface and use a simple paper guide to place each sheet in roughly the same spot. Prepare enough paper before inking, and keep clean hands away from the printing area of each sheet.
Collagraph plates can change as they are printed: a raised fiber may flatten, or a glued edge may loosen. Check the surface between impressions and set aside prints that differ substantially from your intended result. Let prints dry according to the ink you used before stacking or handling them extensively. Even a short series offers a useful lesson: texture is not just something you build into the plate, but something you learn to control through ink, paper, and pressure.